Instructions
Pages
Pages are used for the Home, About, Annual Dinner, Past Dinners, Donate, and Sponsors pages. You can add, update and delete pages – which you can read more about below.
Add a Page
- In the back-end of WordPress, hover over Pages in the left-hand column and click on Add New.
- Alternatively, you can click on Pages in the left hand column, and then click the Add New button at the top of the page.
- Enter a Title, Page Content and click Publish in the top right.
Edit an Existing Page
- In the back-end of WordPress click on Pages in the left hand column, and then click the title of the Page you’d like to update.
- Update the Title and Page Content and click Update in the top right.
Page-Specific Content
Annual Dinner Page
The Annual Dinner page will pull in content from the dinner post that you specify
- Dinner Post — select the dinner post you’d like displayed when you click on the “Annual Dinner” link in the top navigation. Typically this would be the most recent annual dinner.
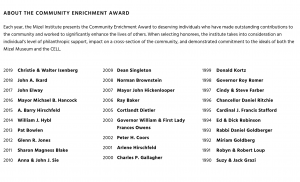
- Award Information — This is the info that will list information about the Community Enrichment Award. Enter an Award Title and Description. All past honorees and years will automatically be pulled in.
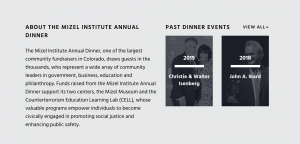
- About Dinner — This is the description for the Mizel Annual Dinner. Enter a Dinner Title and Description. The 2 most recent past dinner events will automatically be pulled in with a link to view all.
Past Dinners Page
The Past Dinners Page is an archive page listing all of the previous dinners. You can add a hero image/video, title and subhead. A list of previous dinner honorees (year and name) will automatically be pulled in.
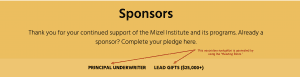
Sponsors Page
The Sponsors Page is the only page with a unique secondary navigation. This navigation is automatically added when you use the Heading Block and add a Title. Therefore, only use the Heading Block on this page when you’d like the title to appear in the navigation directly under the Hero.
Press Releases
Press Releases are the content appearing in the Press section of the website. You can add, update and delete press releases – which you can read more about below.
Add a Press Release
- In the back-end of WordPress, hover over Press Releases in the left hand column and click on Add Press Releases.
- Alternatively, you can click on Press Releases in the left hand column, and then click the Add Press Releases button at the top of the page.
- Enter a Title and Press Release Content in the main content area.
- In the right-hand sidebar under Press Releases, upload a Press Release Document (preferably a PDF). You can also add customizable CTA Text for the download button.
- Click Publish in the top right.
Edit an Existing Press Release
- In the back-end of WordPress click on Press Releases in the left hand column, and then click the title of the Press Release you’d like to update.
- Update the Title and Press Release Content. In the right-hand sidebar, upload Press Release Document (PDF) and enter customizable CTA Text. Click Update in the top right.
Delete an Existing Press Release
- In the back-end of WordPress click on Press Releases in the left-hand column, and then hover over the title of the Press Release you’d like to delete.
- Click on the Trash link that appears below the title.
- To undo a delete, click on the Trash link above the list of Press Releases, find the press release you’d like to restore and click the Restore link.
- Alternatively, you can delete a press release by viewing the edit page for the specific press release, and click Move to Trash in the top right, next to the Update button.
Dinners
Dinners are dinner pages for each annual dinner. You can add, update and delete dinners – which you can read more about below.
Add a Dinner
- In the back-end of WordPress, hover over Dinners in the left-hand column and click on Add New.
- Alternatively, you can click on Dinners in the left-hand column, and then click the Add New button at the top of the page.
- Dinner Hero
- Upload a hero image – ideal size is 1440px x 560px
- Color Overlay – select an overlay color for the section of text (date, CTA button and location) that appears on top of the image
- Date – choose the date of the dinner
- Location – Enter the dinner location. Place on 2 lines if it is a long name.
- CTA Button – enter the button text and the type of link (internal or external)
- Dinner Blocks
- Intro Block — optional content block for any intro copy you’d like to display
- Dinner Time Block — enter a title and click on the “Add Time” button to add an event time and description. You can add up to 4 time slots.
- Honoree Block — this section includes content about the honoree next to a cutout image of the honoree.
- Background Image (Optional) – add a background image
- Background Color – if a background image is not provided, the background will default to the chosen background color.
- Honoree Content — provide content about the honoree. Main heading for the honoree should be Heading 2. Additional Text Editor formatting is described in the Text Formatting section of this page.
- Honoree Photo — Upload a cutout image of the honoree as a transparent png.
- Honoree More Info — If you have more information to add (videos, image galleries, additional content, etc.), click the “Add Block” button and choose either Image Gallery Block or Content Block.
- Content Block — add additional text or videos in this block
- Image Gallery Block — click the “Add Media” button. In the Media area, select Create Gallery from the left-hand sidebar. Choose as many photos as you’d like in the gallery and click the “Create a new gallery” button in the button right. In the Gallery Settings in the right-hand sidebar, select ‘Full Size‘ from the Size dropdown menu. Click “Insert Gallery” button in the button right.
- About Dinner Block – select the checkbox if you’d like to display the about dinner info (see Annual Dinner Page for more info)
- Past Dinner Block — select the checkboxes if you’d like to display the award info and past recipient list (see Annual Dinner Page for more info)
- Dinner Sidebar – In the right-hand sidebar, add the following info (which will be displayed on the past dinners page and in the past recipient list section)
- Honoree Year
- Honoree Name
- Honoree Photo (optional)
- Click Publish in the top right.
Edit an Existing Dinner
- In the back-end of WordPress click on Dinners in the left-hand column, and then click the title of the Dinner you’d like to update.
- Update any of the existing honoree blocks and click Update in the top right.
Delete an Existing Dinner
- In the back-end of WordPress click on Dinners in the left-hand column, and then hover over the title of the Dinner you’d like to delete.
- Click on the Trash link that appears below the title.
- To undo a delete, click on the Trash link above the list of Dinners, find the Dinner you’d like to restore and click the Restore link.
- Alternatively, you can delete a Dinner by viewing the edit page for the specific Dinner, and click Move to Trash in the top right, next to the Update button.
Content Blocks
Content Blocks provide flexible content sections within each of your pages. To add a Content Block, click the “Add Block” button and select from the following:
- Headings — Add a headline and/or subhead to separate sections of your page. NOTE: On the Sponsors page only, this block is used to generate the secondary navigation.
- Image Gallery
- Sidebar Block — For sections where you’d like a sticky sidebar (specifically the donate page). Add the main body content to the “Text Area” section. Click the “Add Row” button for a sidebar. The sidebar will appear on the right-hand side of the page. You can add multiple sidebars if you choose.
- Name Block — this section is for the sponsors and staff. To add a name, click the Add Row button.
NOTE: This content has a fixed height of 200px. Therefore at mobile sizes, there is a great deal of space for much text. Please keep this is mind as you add titles and subtitles.- Background Image (optional) – upload a background image. Recommended only for staff.
- Link (optional) — Add a url (for sponsors)
- Name – if no logo is uploaded, add a name/title
- Logo – upload a sponsor logo. NOTE: If a logo is uploaded, the background image, name and subtitle will NOT be displayed.
- Subtitle – add optional subtitle text
- Testimonial
- Background Image – upload an optional background image
- Quote
- Attribution
- Buttons – add the button CTA text and choose either an internal or external link
- Press Releases — this content block if for the Press Release page (although it could be used on any page). Enter a title for this section and click the checkbox to display the press release blocks. Only the 12 most recent press releases will be displayed and then pagination is added beneath.
- Editor Block — this is a basic WYSIWYG editor for any additional content
Text Formatting
In the WYSIWYG text editor, there are additional formatting options. These include:
- Button – highlight the text you’d like to turn into a button and click either the “White Button” icon or the “Orange Button” icon. The “White Button” should only be used for the sidebar area where the background is orange. When prompted, enter the url for the button.
Orange Button
White Button - Formats – in the Formats dropdown menu, you’ll find a list of the following styles:
- Intro Text — this is a larger font size for introductory text.
Lorem ipsum dolor sit amet, consectetur adipiscing elit, sed do eiusmod tempor incididunt ut labore et dolore magna aliqua. Ut enim ad minim veniam, quis nostrud exercitation ullamco laboris nisi ut aliquip ex ea commodo consequat.
- Left Block/ Right Block – this is for aligning content to the left or right side of the page. Each block will take up 50% of container width. Highlight the content you’d like left-aligned and click the “Left Block.” Similarly, highlight the content you’d like right-aligned and click the “Right Block.” This is ideal for displaying text beside a video, for example.
- Caption – used for a caption or attribution for a blockquote. Font size is 16px.
Here is a short caption
- Inline Link – underlines text and adds an arrow. First, highlight the text you want to link and then click in the link button. Highlight the text again, click the Formats dropdown menu and select “Inline Link.” Ideal for a “Read More” link used in the News section.
Read More
- Intro Text — this is a larger font size for introductory text.
- HTML Formatting – if you need to add an email link in a text field that does not have a WYSIWYG editor, you’ll need to surround the text you’d like to linked within and “a tag.”
<a href=”mailto:email@address.com”>Click Here</a>
Image Sizes
There are specific images that will be cropped to a certain dimension to fit the design. If the uploaded image does not at least meet the cropped dimensions below, it may look pixelated. NOTE: The crop will only occur if the image size is LARGER than the dimensions listed below.
Please note that those images bolded with “black and white” below, will be uploaded as grayscale images. In order for the grayscale effect to take place, these images need to be slightly larger than the indicated cropped dimensions listed below. The minimum upload size is listed. Also, these images must be uploaded in the Media directory in order for the grayscale to occur. Do not upload the images directly in the page or post you are editing.
These are listed below:
- Hero Images — the hero images on pages and dinner posts will be cropped to 1440 x 560px.
- Homepage Logo Backgrounds (black and white) — background images behind the logos in the 2 column format are cropped to 570 x 400px. Upload an image with dimensions of at least 580 x 410px.
- Homepage Logo — the logos on the homepage will be cropped to a maximum width of 400px with a variable height.
- Testimonial Background Images (black and white) — if you upload a background image to the testimonial block, the image will be cropped to 1440 x 486px. Upload an images with dimension of at least 1450 x 496px.
- Name Block (staff section) — background images will be cropped to 330 x 200 px.
- Honoree Block (cutout) — the cutout image of the honoree will be cropped to 940px width with a variable height. Images that show the honoree’s upper body, rather than full body images, are best.
- Past Dinner Honoree Photo (black and white) — in the right-hand sidebar of each dinner post, the “Honoree Photo” — which will be shown on the Past Dinners page — will be cropped to a width of 210px with a variable height. Square or vertical images should be used. Upload an image with dimensions of at least 210px wide.
- Sponsor Logo — logos uploaded to the Name Block should not be more than 500px wide or tall.